![CASHFLOWS LOGO WHITE_RGB.svg]](https://knowledge.cashflows.com/hubfs/Cashflows%20Logos/CASHFLOWS%20LOGO%20WHITE_RGB.svg)
When you use the Cashflows Hosted Payment Page, you can choose which payment methods are displayed to your shoppers. Apple Pay can be enabled in the Cashflows Portal and normally does not require any additional integration changes.
There are no additional Apple Pay-specific charges. Your agreed transaction fees continue to apply, and Apple Pay transactions are processed and settled in the same way as other card transactions. They are also included in your transaction reporting.
To enable Apple Pay:
1. Sign in to the Cashflows Portal.
2. Open Configuration.
3. Select Payment Methods.
4. Select Card.
5. Turn on Allow Apple Pay.
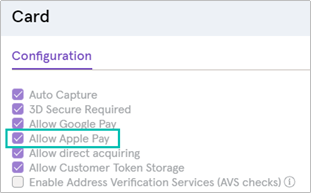
6. Select Save. The change takes effect immediately, and you can begin accepting eligible Apple Pay payments.
Note:
- You do not need an Apple account to offer Apple Pay. Shoppers must have Apple Pay set up on a supported Apple device and use a compatible browser, such as Safari.
- Apple Pay is available through the Hosted Payment Page (HPP). When a shopper uses a supported device and browser, Apple Pay is displayed automatically if it has been enabled for your account.
- Adding a Cashflows hosted payment page to a website
- Customising a Cashflows hosted payment page
Tip: We’re in the process of moving the information in these guides to the new Cashflows Developer Portal. Some of it may already be there.